Introduction to Cinnamon Rolls
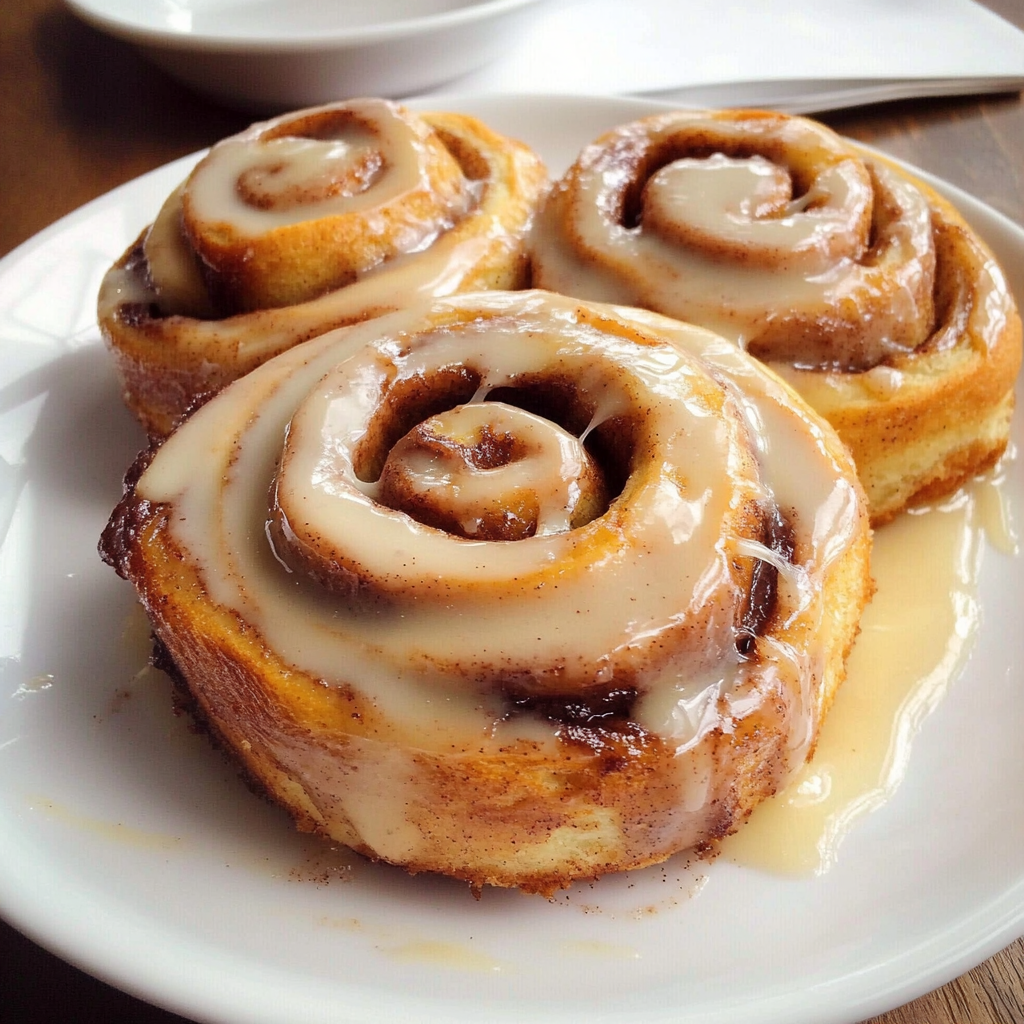
Warm, gooey cinnamon rolls are the very definition of comfort food. These pillowy-soft spirals of sweet dough, swirled with buttery cinnamon sugar filling and finished with a generous slathering of cream cheese frosting, have been a beloved treat across generations and cultures. Whether served as a decadent breakfast pastry, a cozy dessert, or a brunch centerpiece, cinnamon rolls never fail to satisfy.
Their origins trace back to Northern Europe, particularly Sweden’s “kanelbullar”, but the American version has evolved into a softer, richer, frosting-covered delight. With their irresistible aroma and melt-in-your-mouth texture, they’ve earned a permanent spot in bakeries, kitchens, and hearts around the world.
If you love indulgent recipes like Reese’s Peanut Butter Banana Bread or enjoy desserts that are both nostalgic and satisfying, cinnamon rolls should be at the top of your must-bake list.
What Makes a Perfect Cinnamon Roll?
A great cinnamon roll should be:
- Pillowy soft and tender inside
- Packed with buttery cinnamon sugar filling
- Have a gorgeous spiral swirl
- Generously topped with cream cheese frosting
- Slightly crisp on the edges, but melt-in-your-mouth throughout
The secret lies in the dough, the rise, and baking it just right.
The Science Behind the Dough
The foundation of a perfect cinnamon roll is its yeast-leavened dough. This sweet yeast dough rises and develops that signature fluffy texture we crave.
When working with yeast, it’s essential to understand how it works in baking. King Arthur Baking offers a deep dive into the science of yeast, showing how the right environment (warmth and moisture) activates it and helps your rolls rise beautifully.
Use either active dry yeast or instant yeast. Both work, but note that active dry yeast typically needs to be bloomed in warm milk before mixing.
Ingredient Spotlight: Why Each Matters
Each ingredient in a cinnamon roll serves a specific role. Here’s a breakdown of what goes into making magic:
- Flour: All-purpose is most common, but bread flour gives extra chew
- Yeast: Essential for leavening and fluffiness
- Milk: Warmed (not hot!) to activate the yeast
- Sugar: Feeds the yeast and sweetens the dough
- Butter: Adds richness and flavor
- Eggs: Bind everything and add moisture
- Salt: Balances sweetness and enhances flavor
Don’t underestimate how crucial it is to measure flour correctly. Adding too much can make your rolls dense and dry. We recommend spooning flour into your cup or using a kitchen scale. For a detailed guide, visit Serious Eats’ guide to measuring flour.
Step-by-Step: Making the Dough
Creating the dough from scratch is easier than you think. Follow these steps:
- Activate the yeast
Warm the milk to 100–110°F and mix it with yeast and sugar. Let it sit for 5–10 minutes until bubbly. - Mix the dough
Combine the bloomed yeast mixture with eggs, flour, salt, and soft butter. - Knead
Knead by hand for 10–15 minutes or with a stand mixer for 7–10 minutes until the dough is smooth and elastic. Use the windowpane test to check if the dough is ready. - First rise
Place the dough in a greased bowl, cover it, and let it rise in a warm spot until it doubles in size (about 1 to 1.5 hours).
Creating the Cinnamon Filling
The cinnamon sugar filling is what gives these buns their signature flavor. Here’s what you’ll need:
- ½ cup softened butter
- 1 cup brown sugar (light or dark)
- 2 tbsp cinnamon
- A pinch of salt
Tip: Mix the filling into a paste instead of sprinkling dry sugar and cinnamon. It spreads more evenly and melts perfectly into the dough.
🍯 Making the Cinnamon Sugar Filling
The heart of every great cinnamon roll is its irresistible cinnamon sugar filling. It’s a simple blend, but balance is key. Start with softened butter — not melted — so it spreads evenly across the dough. Mix in brown sugar for a deeper, caramel-like sweetness and a rich dose of ground cinnamon for that warm, signature spice.
Add a pinch of salt to enhance the flavors and cut through the sweetness. This buttery mixture should be thick and spreadable, ensuring every bite has that perfect swirl of spiced sweetness without leaking during baking.
How to Knead Cinnamon Roll Dough
Kneading is essential for developing the gluten structure that gives cinnamon roll dough its signature soft and elastic texture. Proper kneading ensures your rolls rise well and turn out light and fluffy instead of dense or tough.
There are two ways to knead: by hand or with a stand mixer.
Kneading by Hand
Start by mixing your ingredients into a shaggy dough. Transfer it to a lightly floured surface and begin kneading using the push-pull-fold method. Use the heels of your hands to push the dough away, fold it back, and rotate. Knead for 10–15 minutes, resisting the urge to add excess flour—even if the dough is a bit sticky. It will smooth out as the gluten develops.
⚙️ Kneading with a Stand Mixer
Attach the dough hook and knead on medium speed for 7–10 minutes. The dough should pull away from the sides of the bowl and form a smooth, stretchy ball.
To test readiness, use the windowpane test: stretch a small piece of dough between your fingers. If it stretches thin without tearing, it’s ready.
Well-kneaded dough leads to tender, pillowy cinnamon rolls every time.
Rolling and Shaping the Cinnamon Rolls
Achieving the iconic spiral swirl in a cinnamon roll is all about proper rolling and shaping technique. Start by rolling your risen dough into a large rectangle—ideally around 12×18 inches. Ensure your surface is lightly floured to prevent sticking, but avoid over-flouring, which can toughen the dough.
Once you’ve spread the cinnamon sugar filling evenly across the rectangle, it’s time to shape. Traditional methods involve rolling the dough tightly from the long edge into a log, then slicing into rolls. While effective, this can compress the swirls and create uneven pieces.
For a cleaner and more consistent result, try the strip method:
- Slice the dough into 12 equal strips (about 1.5 inches wide).
- Roll each strip individually into a tight swirl.
- This gives you greater control and ensures every roll looks perfect.
Use a sharp knife or a pizza cutter for slicing, and consider using unflavored dental floss for cutting the rolled dough — it avoids squishing the shape. Place the rolls in a greased or parchment-lined baking dish, leaving a bit of space between each for the second rise.
Mastering this shaping technique guarantees picture-perfect cinnamon rolls every time.
Second Rise and Baking
After shaping your cinnamon rolls, the second rise — also known as the proof — is crucial for achieving that light, fluffy texture. Let the shaped rolls rest in a warm, draft-free area for about 30–45 minutes, or until they’ve noticeably puffed up. The dough should spring back slightly when gently pressed.
Avoid rushing this step; under-proofed rolls won’t expand properly in the oven, resulting in a dense center. If your kitchen is cold, you can place the rolls in a turned-off oven with the light on to create a gentle warm environment.
Right before baking, consider pouring warm heavy cream over the rolls. This trick keeps the bottoms moist and adds richness. Bake at 350°F (175°C) for 22–25 minutes, until the tops are light golden brown. Avoid overbaking—slightly underdone rolls yield a gooey center, while overbaked ones turn dry.
Perfectly timed baking ensures soft, melt-in-your-mouth cinnamon rolls.
The Perfect Cream Cheese Frosting
No cinnamon roll is complete without a rich, silky cream cheese frosting melting into every swirl. The perfect frosting strikes a balance between sweetness and tang, with a creamy texture that spreads effortlessly.
To make it, blend together:
- 4 oz cream cheese (softened)
- ¼ cup unsalted butter (room temperature)
- 1 cup powdered sugar
- 2–3 tbsp heavy cream
- ½ tsp vanilla extract
Whip the mixture until smooth and fluffy. For best results, use an electric mixer to achieve that light, airy consistency.
Apply the frosting while the rolls are still warm — not hot — so it melts slightly into the cinnamon spirals without becoming runny. If you prefer a glaze-style finish, add a little more cream to thin it out.
This cream cheese frosting recipe is versatile, easy to customize, and elevates your cinnamon rolls from great to unforgettable.
Serving & Storage Tips
- Serve warm from the oven or reheat in the microwave for 20–30 seconds
- Store in an airtight container at room temp for 2–3 days
- Freeze unfrosted rolls for up to 2 months
- Make-ahead tip: Refrigerate shaped rolls overnight, then rise and bake the next morning
Troubleshooting: Common Cinnamon Roll Issues
Why did my rolls come out dense?
- You added too much flour
- The yeast wasn’t active
- The dough wasn’t kneaded enough
Why is the filling leaking out?
- Your kitchen was too warm during the rise
- The butter in the filling melted too early
Why are my rolls dry?
- You overbaked them
- You didn’t measure flour properly
- There wasn’t enough fat in the dough
Creative Variations to Try
Want to switch it up? Try these fun twists:
- Sticky pecan rolls – Add caramel sauce and chopped pecans to the pan
- Pumpkin spice rolls – Add pumpkin puree to the dough and use pumpkin pie spice
- Chocolate cinnamon rolls – Mix cocoa powder into the filling
- Apple cinnamon rolls – Layer thin apple slices with the filling
Frequently Asked Questions (FAQs)
Can I make cinnamon rolls overnight?
Yes! After shaping, refrigerate the rolls covered. Let them sit at room temp for an hour before baking.
Can I substitute eggs?
Yes. Use ½ cup full-fat Greek yogurt per 2 eggs.
Can I freeze baked rolls?
Absolutely. Freeze without the frosting, then reheat and frost fresh.
Why didn’t my dough rise?
Check your yeast. If it doesn’t foam when mixed with warm milk, it may be expired. Also, ensure your room isn’t too cold — ideal proofing temp is around 75–80°F.
Can I use bread flour instead of all-purpose?
Yes! It gives a chewier texture, which some people love. Learn more about Cinnamon and its Health Benefits