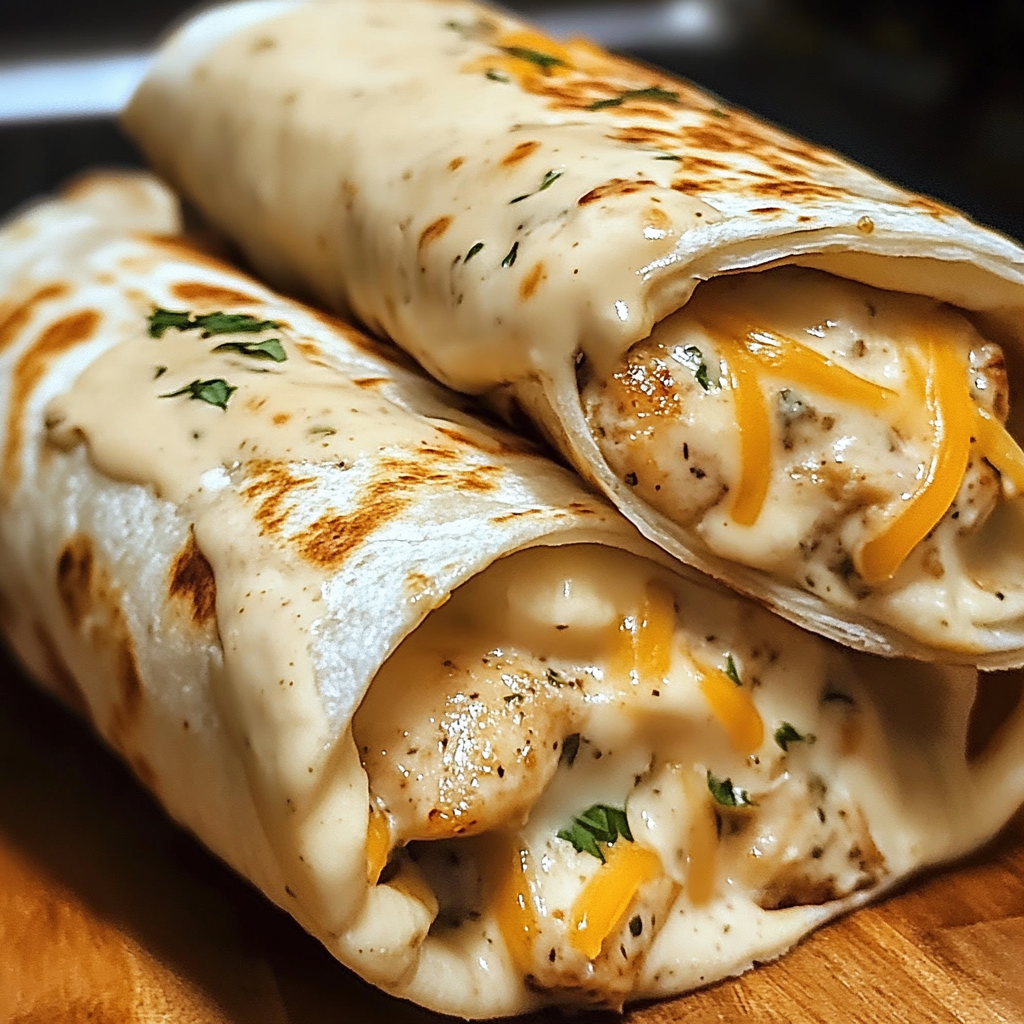
Introduction for Cheesy Garlic Chicken Wraps
Cheesy Garlic Chicken Wraps are the epitome of a quick, delicious, and satisfying meal. Combining garlicky chicken, melted cheese, and a creamy garlic sauce in a warm tortilla, this dish is perfect for busy weeknights or indulgent weekends. Whether you’re a fan of classic wraps or enjoy experimenting with new flavors, this recipe offers endless possibilities.
If you’re interested in more ways to elevate your cooking game, explore these creative wrap recipes that are easy to make and sure to impress.
Why Cheesy Garlic Chicken Wraps Are a Must-Try
Cheesy Garlic Chicken Wraps stand out for their irresistible combination of flavors and their ease of preparation. The savory, garlicky chicken is perfectly complemented by the gooey, melted cheese and the creamy garlic sauce that ties it all together. These wraps are not just a meal—they’re an experience of indulgent comfort food.
What makes them truly special is their versatility. You can customize the recipe with your favorite cheeses, add vegetables like sautéed spinach or mushrooms, or even use gluten-free tortillas for dietary preferences. Their kid-friendly appeal makes them a hit at the dinner table, while their quick preparation time—under 30 minutes—makes them perfect for busy weeknights.
Whether served with crispy fries, a light salad, or tangy coleslaw, these wraps are guaranteed to satisfy every craving. It’s no wonder they’ve become a go-to recipe for both novice and experienced cooks alike!
For another comfort food idea, try these mini chicken pot pies—a bite-sized twist on a family favorite.
Essential Ingredients
Cheesy Garlic Chicken Wraps are made with a handful of simple yet flavorful ingredients that work together to create a delicious and satisfying dish. Here’s what you’ll need:
- Chicken: Boneless, skinless chicken breasts or thighs, diced into bite-sized pieces. Thighs offer extra juiciness, while breasts are leaner and cook quickly.
- Seasonings: Garlic powder, onion powder, paprika, salt, and pepper create the perfect savory and slightly smoky flavor profile. Adjust these to suit your taste preferences.
- Cheeses: A mix of sharp cheddar and mozzarella provides the best of both worlds—bold flavor and a creamy, melty texture. Feel free to experiment with other melting cheeses like gouda or pepper jack.
- Tortillas: Soft flour tortillas are ideal for folding and grilling. Choose gluten-free or whole-grain options if needed.
- Creamy Garlic Sauce: This is the star of the wraps! A homemade blend of mayonnaise, garlic, and lemon juice works wonders, but a quality store-bought garlic aioli can save time.
Optional ingredients like fresh parsley for garnish or a sprinkle of chili flakes for heat can elevate the wraps even further. With these essentials on hand, you’ll be ready to whip up this comforting, crowd-pleasing dish in no time!
For additional inspiration, learn how to craft your own garlic butter sauce to complement various dishes.
Step-by-Step Guide
1. Prepare the Chicken Filling
The chicken filling is the heart of Cheesy Garlic Chicken Wraps, and preparing it correctly ensures a flavorful, tender bite every time. Here’s how to get it just right:
- Dice the Chicken: Start by cutting boneless, skinless chicken breasts or thighs into evenly sized bite-sized pieces. This ensures uniform cooking and prevents some pieces from drying out.
- Season Generously: In a bowl, toss the chicken with olive oil, garlic powder, onion powder, paprika, salt, and pepper. These seasonings infuse the chicken with a savory, slightly smoky flavor. For extra depth, consider adding a pinch of cayenne for heat or smoked paprika for a richer aroma.
- Cook to Perfection: Heat a non-stick skillet over medium heat. Add the seasoned chicken and cook for 6–8 minutes, stirring occasionally, until the chicken is golden brown and fully cooked (internal temperature of 165°F). Be careful not to overcook to avoid dryness.
- Optional Enhancements: If time allows, marinate the chicken in the seasoning mixture for 30 minutes before cooking to enhance flavor. Alternatively, grill the chicken for a smoky char or use an air fryer for a healthier option.
This perfectly cooked chicken is now ready to star in your delicious Cheesy Garlic Chicken Wraps!
2. Make the Garlic Sauce
The creamy garlic sauce is the secret ingredient that takes Cheesy Garlic Chicken Wraps from good to extraordinary. It’s rich, tangy, and perfectly complements the garlicky chicken and melted cheese. Here’s how to make it:
- Basic Ingredients: Combine ½ cup of mayonnaise, 1–2 cloves of freshly minced garlic, and 1 teaspoon of lemon juice in a mixing bowl. The mayonnaise forms the creamy base, while the garlic delivers bold flavor and the lemon juice adds a bright, tangy note.
- Enhance the Flavor: Add a pinch of salt and pepper to taste. For extra depth, stir in a sprinkle of dried parsley or dill, a dash of smoked paprika, or even a small amount of Dijon mustard.
- Whisk Until Smooth: Use a whisk to blend the ingredients until the sauce is smooth and well combined. Taste and adjust the seasonings as needed.
This sauce can be made ahead of time and stored in an airtight container in the refrigerator for up to a week. Use it generously on your wraps or as a dip for added indulgence!
3. Assemble the Wraps
The assembly process is where all the delicious elements of Cheesy Garlic Chicken Wraps come together. Follow these steps to ensure perfectly layered, tightly wrapped goodness:
- Prepare the Tortillas: Use fresh, large flour tortillas for best results. If they’re slightly stiff, warm them in the microwave for 10–15 seconds or in a dry skillet for a few seconds per side to make them pliable.
- Spread the Garlic Sauce: Begin with a generous layer of creamy garlic sauce spread evenly across the center of the tortilla. This ensures every bite is packed with flavor.
- Add the Chicken: Place a portion of the prepared garlicky chicken on top of the sauce, spreading it out for even distribution. Be mindful not to overfill to avoid difficulty when folding.
- Top with Cheese: Sprinkle a mix of sharp cheddar and mozzarella cheese over the chicken. The cheddar adds boldness, while the mozzarella provides a creamy melt.
- Fold the Wrap: Fold the sides of the tortilla inward, then roll it tightly from the bottom up to seal the ingredients inside. Ensure the seam is secure for cooking.
With your wraps assembled, they’re ready to hit the skillet for that crispy, golden-brown finish!
4. Cook the Wraps
Cooking Cheesy Garlic Chicken Wraps to golden perfection is the final step in bringing this delicious dish to life. Here’s how to do it:
- Heat the Skillet: Preheat a non-stick skillet or griddle over medium heat. For added flavor, you can lightly grease the pan with a small amount of butter or olive oil.
- Place Seam-Side Down: Arrange the wraps in the skillet seam-side down first. This helps to seal the tortilla and prevents it from opening during cooking.
- Cook to Golden Brown: Cook each side for 2–3 minutes, pressing gently with a spatula to ensure even toasting. The goal is a crispy, golden exterior with the cheese melted and gooey inside.
- Monitor Heat: Adjust the heat as needed to prevent the tortillas from burning before the cheese melts.
- Serve Hot: Remove the wraps from the skillet and let them rest for a minute before slicing. Cutting them diagonally adds a professional touch.
These warm, crispy wraps are now ready to be enjoyed, either on their own or with your favorite

Perfect Pairings
Cheesy Garlic Chicken Wraps shine when paired with flavorful sides, such as:
- Sweet potato fries.
- A tangy coleslaw.
- A simple green salad.
For an upgraded meal, consider serving these wraps with a comforting bowl of vegetable beef barley soup.
Variations
Take your wraps to the next level with these creative twists:
- Add Veggies: Include sautéed mushrooms, spinach, or bell peppers for extra nutrition.
- Experiment with Cheeses: Try pepper jack for heat or gouda for a smoky flavor.
- Make It Vegetarian: Replace chicken with tofu or roasted chickpeas.
Serving Suggestions
Cheesy Garlic Chicken Wraps are versatile and pair wonderfully with a variety of sides and accompaniments to create a complete, satisfying meal. Whether you’re serving them for dinner, lunch, or a casual gathering, these ideas will elevate your wraps:
- Classic Sides:
- French Fries: Serve with crispy, seasoned fries for a traditional pairing. Sweet potato fries add a sweet and savory twist.
- Coleslaw: A tangy coleslaw complements the rich, cheesy flavors of the wraps and adds a refreshing crunch.
- Salads:
- A light, mixed green salad with a zesty vinaigrette balances the creaminess of the wraps.
- Opt for a Caesar salad for a classic, complementary side.
- Dipping Sauces:
- Garlic Aioli: Enhance the garlic flavor with a side of homemade or store-bought garlic aioli.
- Ranch Dressing: A crowd-pleasing dip that pairs beautifully with the wraps.
- Hearty Soups:
- Serve alongside a comforting bowl of tomato soup or a hearty vegetable beef barley soup for a warm and cozy meal.
- Beverages:
- Pair with a refreshing iced tea or a sparkling lemonade for the perfect meal accompaniment. you can also visit Cheesy Chicken Wraps
These wraps are as versatile as they are delicious, making them ideal for any occasion!
Storage and Meal Prep
Storing Leftovers:
- Refrigerate wraps in foil for up to 3 days.
- Reheat in a skillet to maintain crispness.
Meal Prep Tips:
- Cook chicken ahead of time and store in the fridge.
- Pre-shred cheese for quicker assembly.
FAQs about Cheesy Garlic Chicken Wraps
Here are answers to some common questions about making and enjoying Cheesy Garlic Chicken Wraps:
1. Can I use gluten-free tortillas?
Absolutely! Gluten-free tortillas work just as well. Be gentle when folding, as they can be more fragile than regular flour tortillas.
2. What are good side dishes to serve with these wraps?
These wraps pair wonderfully with classic sides like fries, tangy coleslaw, or a simple green salad. For a heartier meal, try them with vegetable beef barley soup or a creamy tomato soup.
3. Can I make these wraps ahead of time?
Yes! You can prepare the chicken filling and garlic sauce ahead of time. Assemble the wraps when ready to eat, and toast them fresh for the best texture and flavor.
4. How do I prevent the wraps from falling apart?
Avoid overfilling the tortillas and fold them tightly. Cooking seam-side down first helps seal the wraps for easier handling.
5. What other cheeses can I use?
Feel free to experiment with different melting cheeses like gouda, pepper jack for a spicy kick, or Monterey Jack for a milder flavor.
These FAQs cover the essentials to help you create and enjoy your wraps with confidence!


